Installing & first connection
From nothing installed to a server open in the right-hand pane. Ten minutes, most of it spent finding your credentials.
Installing
Velocity Bridge is distributed through the Microsoft Store. The Store handles installation, updates and signing, so there is no separate installer to download, nothing to unblock, and no "unknown publisher" warning to click past.
Requirements: Windows 10 or 11, 64-bit. There is no 32-bit or ARM64 build, and no macOS or Linux build yet.
Updates arrive through the Store like any other app. You can force a check from the Store's Library → Get updates.
What you need before you start
Four things, from whoever runs the server — a hosting control panel, a systems administrator, or your own notes:
| Protocol | SFTP, FTPS, or plain FTP. If nobody has told you, ask — it is not guessable, and the wrong choice fails in confusing ways. |
| Host | A name like files.example.com, or an IP address. |
| Port | Usually left at the default: 22 for SFTP, 21 for FTP and explicit FTPS, 990 for implicit FTPS. |
| Username and password | Or an SSH key, if that is how the server is set up. |
SFTP is not "FTP over SSL". The names are confusingly close and they are unrelated protocols. SFTP runs over SSH, normally on port 22. FTPS is FTP with TLS added, on 21 or 990. A server offering one will usually not accept the other. If a connection fails immediately with nothing useful in the log, a mismatched protocol is the first thing to check.
Your first connection
- Open Site Manager from the toolbar, or press Ctrl+S.
- Choose New site and give it a name you will recognise later — the name is for you, not the server.
- Pick the protocol, then fill in host, port, and username.
- Choose how you authenticate: password, SSH key, SSH certificate, an agent, or keyboard-interactive.
- Press Connect.
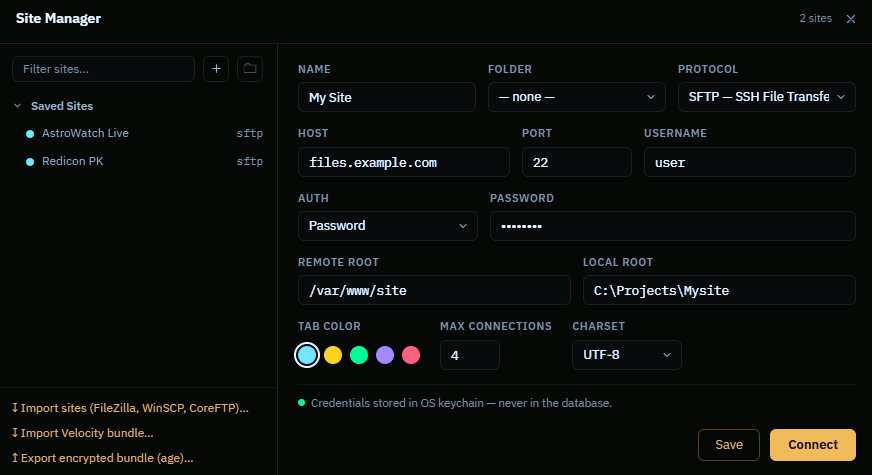
For a one-off connection you do not want to keep, use Quick Connect in the toolbar instead. It takes the same details and saves nothing.
The prompt you will probably see
On the first SFTP connection to any server, Velocity Bridge asks you to verify its host key fingerprint. This is not an error and not a warning about your server being unsafe — it is the one moment where you get to confirm that the machine answering is the machine you meant.
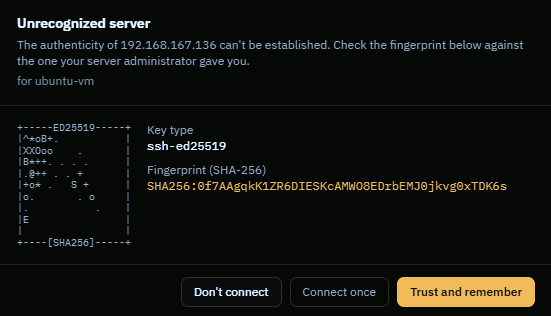
Compare the fingerprint on screen with the one from your hosting panel or your administrator, then choose Trust and remember. Full detail in Every dialog explained and Security.
Over FTPS you may instead see Unverified certificate, which works the same way.
When the first connection fails
Open the Session Log panel at the bottom of the window. It shows every command sent and every reply received, with passwords stripped out as they are written. The server's own words are usually more informative than anything the app can say about them.
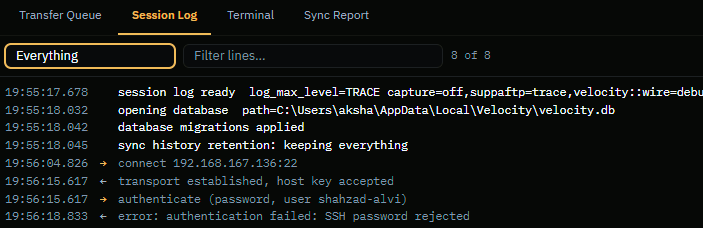
| Nothing happens, then a timeout | Wrong host, wrong port, or a firewall in between. Check the port matches the protocol. |
| Connected, then rejected | You reached the server and it refused your credentials. Username, password, or an account not permitted to use this protocol. |
| Connects, then hangs listing a folder | Classic FTP passive-mode problem — see Troubleshooting. |
The distinction between "could not connect" and "connected but login failed" is the single most useful thing in the log, because it halves the search space immediately.
What happens to your password
If you let Velocity Bridge remember a password it goes to Windows Credential Manager, the operating system's own encrypted store. It is never written to the app's database, its configuration files, or its logs. The session log strips passwords as it writes rather than filtering them afterwards, so they are not in the file even momentarily.
This is covered properly in Security.
Next
With a server open, the next thing worth understanding is the two-pane layout — it is where most of the day goes.